Sweet Treats for Your Valentine!

February 10, 2023
Everyone knows the scariest part of Valentine’s day is deciding what to get your special someone. Whether they’re a long-term partner or a new flame, the decision is always daunting. Thoughtful planning isn’t always easy but with these treats, you won’t have to get your partner a meaningless generic gift. Your partner is bound to love these delicious easy-to-follow recipes! With the help of my friends at IBW Cadence Shaver who crafted the recipe for the rice krispies, red velvet Oreos, and Cupcakes along with Ania Leonardo who made the cake pops and sweetheart cookies, we created a compilation of sweet treats for you and your valentine.
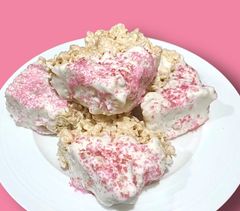
Rice Krispies:
The easiest treat to make is rice krispies with only two ingredients: cereal and marshmallows. Don’t let the simplicity fool you; they are just as delicious as the rest of the recipes. Not only that but they’re cute too! The sprinkles and chocolate options make this a recipe that can be customized for your partner’s tastes. These are my favorite because you can make them in under 30 minutes and you don’t have to worry about cleaning up since there aren’t very many ingredients and there is no gooey batter involved. Additionally, the flavor is legitimately delicious!
Ingredients:
- 6 Tbsp unsalted butter
- 16 oz. mini marshmallows
- 1 tsp vanilla extract
- 6 cups rice krispie cereal
Instructions:
- Line a 9-inch square baking dish with parchment paper
- In a large saucepan, melt butter over medium heat. Once melted, add in all but 1 cup of the marshmallows. Reduce heat to low and continue stirring until completely melted
- Remove from heat and stir in the vanilla extract. Then add the cereal and the remaining 1 cup of marshmallows. Stir until combined
- Pour into the prepared baking dish and gently press with your fingertips until it’s completely spread out.
- Allow them to set for about an hour. Cut and enjoy!

Sweetheart Cookies:
It’s hard to go wrong with this Valentine’s Day classic. This cookie spin on the beloved hard candy makes for a delightful and creative gift. Make your own quotes or phrases for your valentine to personalize this treat. Sugar cookies are easy to make and frosting them is always fun. Mix and match colors to make these cookies uniquely you. Show off how well you know your valentine by using phrases they might find cute or funny. For this recipe, we used Sally’s Baking Addiction sugar cookies.
Ingredients:
- 2 and 1/4 cups (281g) all-purpose flour (spoon & leveled), plus more as needed for rolling and work surface
- 1/2 teaspoon baking powder
- 1/4 teaspoon salt
- 3/4 cup (1.5 sticks or 170g) unsalted butter, softened to room temperature
- 3/4 cup (150g) granulated sugar
- 1 large egg, at room temperature
- 2 teaspoons pure vanilla extract
- 1/4 or 1/2 teaspoon almond extract (optional, but makes the flavor outstanding)
- *Royal Icing or easy cookie icing
Instructions:
- Whisk the flour, baking powder, and salt together in a medium bowl. Set aside.
- In a large bowl using a hand mixer or a stand mixer fitted with a paddle attachment beat the butter and sugar together on high speed until completely smooth and creamy, about 2 minutes. Add the egg, vanilla, and almond extract (if using) and beat on high speed until combined, about 1 minute. Scrape down the sides and up the bottom of the bowl and beat again as needed to combine.
- Add the dry ingredients to the wet ingredients and mix on low until combined. Dough will be relatively soft. If the dough seems too soft and sticky for rolling, add 1 more Tablespoon of flour.
- Divide the dough into 2 equal parts. Place each portion onto a piece of lightly floured parchment paper or a lightly floured silicone baking mat. With a lightly floured rolling pin, roll the dough out to about 1/4-inch thickness. Use more flour if the dough seems too sticky. The rolled-out dough can be any shape, as long as it is evenly 1/4-inch thick.
- Lightly dust one of the rolled-out doughs with flour. Place a piece of parchment on top. (This prevents sticking.) Place the 2nd rolled-out dough on top. Cover with plastic wrap or aluminum foil, then refrigerate for at least 1-2 hours and up to 2 days.
- Once chilled, preheat oven to 350°F (177°C). Line 2-3 large baking sheets with parchment paper or silicone baking mats. Carefully remove the top dough piece from the refrigerator. If it’s sticking to the bottom, run your hand under it to help remove it– see me do this in the video above. Using a cookie cutter, cut the dough into shapes. Re-roll the remaining dough and continue cutting until all is used. Repeat with 2nd piece of dough. (Note: It doesn’t seem like a lot of dough, but you get a lot of cookies from the dough scraps you re-roll.)
- Arrange cookies on baking sheets 3 inches apart. Bake for 11-12 minutes or until lightly browned around the edges. If your oven has hot spots, rotate the baking sheet halfway through bake time. Allow cookies to cool on the baking sheet for 5 minutes then transfer to a wire rack to cool completely before decorating.
- Decorate the cooled cookies with royal icing or easy cookie icing. Feel free to tint either icing with gel food coloring. See post above for recommended decorating tools. No need to cover the decorated cookies as you wait for the icing to set. If it’s helpful, decorate the cookies directly on a baking sheet so you can stick the entire baking sheet in the refrigerator to help speed up the icing setting.
- Enjoy cookies right away or wait until the icing sets to serve them. Once the icing has set, these cookies are great for gifting or for sending. Plain or decorated cookies stay soft for about 5 days when covered tightly at room temperature. For longer storage, cover and refrigerate for up to 10 days.

Red Velvet Oreos:
It’s not easy to find someone who doesn’t like Oreos. For this holiday season, they can be homemade into the perfect Valentine’s day present. With these Red Velvet Oreos, you’re sure to win your special someone over. The cream filling is especially customizable with the option to add food coloring or sprinkles plus the cookie is better than any store-bought version. The red velvet coloring makes for a festive Valentine’s Day snack that the perfect someone is sure to love.
Ingredients:
- 1 3/4 cups all-purpose flour
- 3 tbsp cocoa powder
- ¼ tsp baking powder
- ¼ tsp salt
- ¾ cup unsalted butter, room temperature
- ¾ cup granulated sugar
- 1 large egg
- 1 tbsp red food coloring
Cream cheese frosting:
- 4 oz. cream cheese, room temperature
- ½ cup unsalted butter, room temperature
- 2 cups powdered sugar
- 1 tsp vanilla extract
- 1-2 tbsp milk
- ½ tsp salt
Instructions:
- Mix all purpose flour, cocoa powder, and salt together
- In another bowl, beat the butter and sugar on medium for about 1 minute, until completely combined. On the lowest speed, mix in the egg until well combined
- Mix in the red food coloring until well combined
- Mix in the dry ingredients until combined. The dough should be tacky but not wet and sticky.
- Let the dough chill for at least 1-2 hours
- Preheat the oven to 375 degrees F and prepare a large baking sheet. Remove the cookie dough from the fridge. Take about a golf ball sized amount of dough and roll it into a ball then flatten it into a disc and transfer the disc onto the prepared baking sheet.
- Bake the cookies for about 8-11 minutes. The edges of the cookie should be set and the centers will look slightly less baked.
- Cool the cookies on the hot baking sheet for 3 minutes. Then transfer the cookies to a cooling rack to cool completely.
- Make the cream cheese filling by beating the cream cheese with the butter until smooth and well combined. Beat the powdered sugar, vanilla extract and milk with the cream cheese and butter until your desired consistency is reached.
- Using a tablespoon sized spoon, apply the cream cheese filling to the bottom half of the baked red velvet cookies. Top with the other baked cookie.
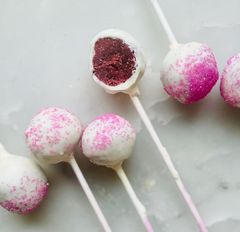
Cake Pops:
These tasty goodies may seem intimidating to the inexperienced baker, but with a little time and effort, you’ll find the final product to be worthwhile. Not to mention your partner is sure to love the dedication put into their gift. They are also perfect for outdoor dates! This recipe is seriously good, these are way better than your run-of-the-mill Starbucks cake pop. We used Sally’s Baking Addiction red velvet recipe to get the perfect flavor for this one.
Ingredients:
- 3 cups (360g) cake flour (spoon & leveled)
- 1 teaspoon baking soda
- 2 Tablespoons (10g) unsweetened natural cocoa powder
- 1/2 teaspoon salt
- 1/2 cup (115g) unsalted butter, softened to room temperature
- 2 cups (400g) granulated sugar
- 1 cup (240ml) canola or vegetable oil
- 4 large eggs, room temperature and separated
- 1 Tablespoon pure vanilla extract
- 1 teaspoon distilled white vinegar
- liquid or gel red food coloring
- 1 cup (240ml) buttermilk, at room temperature
- Premade frosting (it doesnt make sense to make your own since you only need about 2 tablespoons)
Instructions:
Cake:
- Preheat the oven to 350°F (177°C). Grease two 9-inch cake pans, line with parchment paper rounds, then grease the parchment paper. Parchment paper helps the cakes seamlessly release from the pans. (If it’s helpful, see this parchment paper round for cakes video & post.)
- Make the cake: Whisk the flour, baking soda, cocoa powder, and salt together in a large bowl. Set aside.
- Using a handheld or stand mixer fitted with a paddle attachment, beat the butter and sugar together on medium-high speed until combined, about 1 minute. Scrape down the sides and up the bottom of the bowl with a rubber spatula as needed. Add the oil, egg yolks, vanilla extract, and vinegar and beat on high for 2 minutes. (Set the egg whites aside.) Scrape down the sides and up the bottom of the bowl with a rubber spatula as needed.
- With the mixer on low speed, add the dry ingredients in 2-3 additions alternating with the buttermilk. Beat in your desired amount of food coloring just until combined. I use 1-2 teaspoons of gel food coloring. Vigorously whisk or beat the 4 egg whites on high speed until fluffy peaks form as pictured above, about 3 minutes. Gently fold into cake batter. The batter will be silky and slightly thick.
- Divide batter between cake pans. Bake for 30-32 minutes or until the tops of the cakes spring back when gently touched and a toothpick inserted in the center comes out clean. If the cakes need a little longer as determined by wet crumbs on the toothpick, bake for longer. However, be careful not to overbake as the cakes may dry out. Remove cakes from the oven and cool completely in the pans set on a wire rack. The cakes must be completely cool before assembling.
Cake pop assembly:
- Take your cake and break it up in a bowl. You can use your hands for this. You want to make small crumbles- almost like sand. Alternatively you can also use a hand mixer to break up the pieces.
- Add small amounts of frosting into the cake crumbles until you have a moldable cake mix (about 2 heaping tablespoons).
- Scoop up about a tablespoon of the mixture and roll it into a ball. Repeat this step until all of your batter has been used.
- Use a small bag of chocolate and melt completely in a medium bowl.
- Dip the tip of your stick into the melted chocolate, then put the stick into a cake ball. Repeat until none is left.
- Once complete, dip the whole cake pop into the melted chocolate. Then allow it to dry. The best way to do this is by putting the stick end of the cake pop into something like styrofoam so that the cake pop stands upright.
- Add sprinkles while the chocolate is still hot.

Red Velvet Cupcakes:
This beloved flavor is ideal for Valentine’s day festivities. They can be made for parties, family, and of course your valentine. No matter who you make them for they’re sure to be a hit! Not to mention they take very little time to perfect. If you feel like making them special you can add a chocolate heart or other small candies like sweethearts! You could also add some pizazz to the generic cupcake with cute sprinkles.
Ingredients:
- 1 ⅓ cup flour
- 1 tbsp cocoa powder
- 1 ½ tsp baking powder
- Pinch of salt
- 4 tbsp unsalted butter
- ⅔ cups granulated sugar
- 2 large eggs
- ⅓ cup vegetable oil
- ½ cup butter milk
- 1 tsp vanilla extract
- ½ tsp white vinegar
- 1 tbsp red food coloring
Cream cheese frosting:
- 4 oz. cream cheese, room temperature
- ½ cup unsalted butter, room temperature
- 2 cups powdered sugar
- 1 tsp vanilla extract
- 1-2 tbsp milk
- ½ tsp salt
Instructions:
- Preheat oven to 350 degrees F and line a 12 hole muffin pan with cupcake liners
- Mix dry ingredients in their own bowl then set aside.
- Cream the butter and sugar together in another bowl. Once combined, beat in the eggs. Then add in the remaining wet ingredients.
- Mix in the dry ingredients one cup at a time until completely combined.
- Fill each cupcake liner with the mixture about ¾ of the way full.
- Bake for 20 minutes or until a skewer comes out clean.
- Let the cupcakes cool completely on a wire rack before frosting.
- Make the cream cheese filling by beating the cream cheese with the butter until smooth and well combined. Beat the powdered sugar, vanilla extract and milk with the cream cheese and butter until your desired consistency is reached.
- Once the cupcakes are cooled, put frosting in a piping bag and pipe onto cupcakes.
Homemade baking is such a sweet heartfelt gift that anyone would love. Treat your valentine this year with something to truly swoon them and their taste buds. With what little time and effort it takes to make any of these recipes, why wouldn’t you? You could even make these goods for a fun date with your special someone. Get in the kitchen and whip something up!
Sources:
Sally’s Sugar cookies:
https://sallysbakingaddiction.com/best-sugar-cookies/
Sally’s Red velvet:
https://sallysbakingaddiction.com/red-velvet-layer-cake-with-cream-cheese-frosting/


